Cloud in a Box
💡 Cloud in a Box (CiaB) is a minimalistic installation of the latest stable OSISM release with only services which are needed to make it work with Kubernetes. It is intended for use as a development system on bare-metal or for use in edge environments or for training purposes. Its flexibility makes it ideal for building, testing, and refining cloud infrastructure setups in controlled environments, enabling teams to experiment with different configurations and scenarios before deploying them to production
At the moment the secrets are stored in plain text in the osism/cloud-in-a-box repository and are not secure. Do not use for public accessible systems. In the future, the secrets will be generated automatically.
Requirements
The system to be used as Cloud in a Box must fulfill these minimum requirements.
| Type of resource | Amount | Note |
|---|---|---|
| CPU | at least 1 socket with 4 cores | More is better here. This is the minimum where you can't use much payload (LBaaS, VMs). The use of Kubernetes with Cluster API is not possible with this minimum size. |
| RAM | at least 32 GByte | More is better here. In principle, it also works with 8 GByte, but then no payload (LBaaS, VMs) can be used. Kubernetes with Cluster API cannot be used then. |
| Storage | at least 1 TByte | Has to be available as /dev/sda or /dev/nvme0n1. Less than 1 TByte is also possible, the smaller the less storage is available for use in Ceph. |
| Network | at least 1 network interface (DHCP and internet access) | An optional 2nd network interface can be used for external connectivity. |
| USB stick | at least 2 GByte | Installation media for Cloud in a Box bootstrapping |
Types
There are three types of Cloud in a Box.
-
The sandbox type is intended for developers and demonstrations. A full OSISM installation is one there which also includes Ceph and OpenSearch, for example. In the course of the installation, necessary images, networks, etc. are also created.
-
The edge type is intended to be deployed as an appliance to provide an edge cloud on a single node. Compared to the sandbox, certain services are not provided there or are implemented differently. For example, OpenSearch is not deployed because the logs are delivered to a central location. The storage backend will also be implemented differently there in the future instead of Ceph.
-
The kubernetes type is intended to be deployed as an appliance to provide a edge Kubernetes cluster on a single node.
Installation
Automated installation (recommended)
The images currently download and install the latest state of the installation scripts, therefore it is mandatory to update the installation media at least when the underlying Ubuntu operating system release changes. The installation of older releases is currently not supported.
-
Download one of the Cloud in a Box images of type sandbox
- ubuntu-autoinstall-cloud-in-a-box-1.iso (with first block device as
/dev/sda) - ubuntu-autoinstall-cloud-in-a-box-2.iso (with first block device as
/dev/nvme0n1)
- ubuntu-autoinstall-cloud-in-a-box-1.iso (with first block device as
-
Use a tool like balenaEtcher or
ddto create a bootable USB stick with the Cloud in a Box image. -
Boot from the USB stick. Make sure that the boot from USB is activated in the BIOS.
warningWhen booting from this USB stick, all data on the hard disks will be destroyed without confirmation.
-
The installation of the operating system (Ubuntu 22.04) will start and take a few minutes. After that the system will shutdown.
-
The first start of the system
- Remove the USB storage device (The USB stick is only needed again if the Cloud in a Box system is to be fully reinstalled.)
- Connect the first network interface to an ethernet interface that provides access to the internet via DHCP configuration
- Boot the system from the internal hard disk device
-
The deployment will start. This takes some time and the system will shutdown when the deployment is finished. This takes roughly an hour, possibly longer depending on the hardware and internet connection.
-
Start the system again. System is ready for use, by default DHCP is tried on the first network device.
-
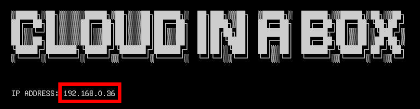
Login via SSH. Use the user
dragonwith the passwordpassword.ssh dragon@IP_ADDRESS_FROM_YOUR_SERVERinfoYou can obtain the IP address by inspecting the logs of your DHCP server or from the issue text of the virtual consoles of the system.
Manual installation
The scripts are not idempotent yet. In case there is any fail during bootstrap.sh or deploy.sh you have to
start over with fresh installation.
-
Follow the provisioning guide, skip the part about disk layout and do it this way:
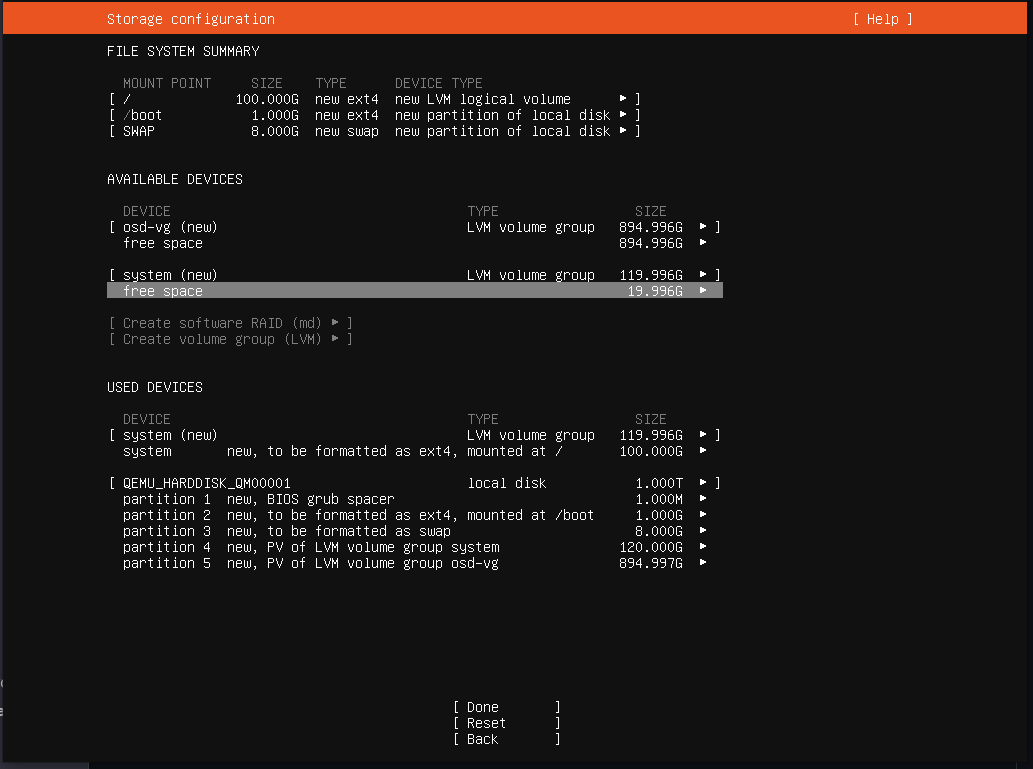
- Create a 1 GByte ext4 partition mounted in
/boot - Create a 8 GByte swap partition
- Create a 120 GByte unformatted partition
- Use a
Create volume group (LVM)to create a volume group calledsystemwith the size of 120 GByte on the partition 4 you just created - Create a logical volume by selecting the
Free Spaceoption undersystemLVM. This volume should be mounted in/and have size of 100 GByte - Create a partition with the size of the rest of the drive's space
- Create a new LVM volume group on partition 5 called
osd-vg(will be used for Ceph)
- Create a 1 GByte ext4 partition mounted in
-
After the Ubuntu installation, the system will be rebooted
-
Log into the machine via console to get its IP address and then use SSH to connect to the machine
-
Clone the osism/cloud-in-a-box repository into
/opt/cloud-in-a-boxsudo git clone https://github.com/osism/cloud-in-a-box /opt/cloud-in-a-box -
Disable conflicting services from the default Ubuntu installation
sudo /opt/cloud-in-a-box/cleanup.sh -
Install upgrades
sudo apt update
sudo apt upgrade -
Run the
bootstrap.shscript with the required type (use ofsandboxis recommended)sudo /opt/cloud-in-a-box/bootstrap.sh sandbox -
Run the
deploy.shscript with the same type as in step 8 to deploy services like Ceph and OpenStacksudo /opt/cloud-in-a-box/deploy.sh sandbox -
Shutdown the system
sudo shutdown -h now -
Start the system again. System is ready for use, by default DHCP is tried on the first network device.
-
Login via SSH. Use the user
dragonwith the passwordpassword.ssh dragon@IP_ADDRESS_FROM_YOUR_SERVERinfoYou can obtain the IP address by inspecting the logs of your DHCP server or from the issue text of the virtual consoles of the system.
Usage
Wireguard VPN service access
Copy the /home/dragon/wireguard-client.conf file from Cloud in a Box to your workstation. This is necessary
for using the web endpoints on your workstation. Rename the Wireguard config file to something
like cloud-in-a-box.conf.
If you want to connect to the Cloud in a Box system from multiple clients, change the client IP address in the config file to be different on each client.
scp dragon@IP_ADDRESS_FROM_YOUR_SERVER:/home/dragon/wireguard-client.conf $HOME/cloud-in-a-box.conf
Install Wireguard on your workstation, if you have not done this before. For instructions how to do it on your workstation, please have a look on the documentation of your used distribution. The Wireguard documentation you will find here.
Start the Wireguard tunnel.
sudo wg-quick up $HOME/cloud-in-a-box.conf
Once the Wireguard tunnel has been set up, it is possible to access individual services on a name-based basis.
As a test, you can try whether the name api.in-a-box.cloud resolves correctly to the IP address 192.168.16.254.
dig +short A api.in-a-box.cloud
192.168.16.254
If this does not work, a DNS filter such as Pi-hole or AdGuard will most likely be used. This ensures that private
IP ranges such as 192.168.16.0/20 are not resolved via a public DNS server. If this is the case, the following
entries must be added to the local /etc/hosts file for the name resolution to work.
192.166.16.10	cgit.services.in-a-box.cloud
192.166.16.10	netbox.services.in-a-box.cloud
192.168.16.10	ara.services.in-a-box.cloud
192.168.16.10	flower.services.in-a-box.cloud
192.168.16.10	homer.services.in-a-box.cloud
192.168.16.10	phpmyadmin.services.in-a-box.cloud
192.168.16.10   manager.systems.in-a-box.cloud
192.168.16.254	api.in-a-box.cloud
Webinterfaces
If you want to access the services please choose the URL from the following list:
| Name | URL | Username | Password | Note |
|---|---|---|---|---|
| ARA | https://ara.services.in-a-box.cloud | ara | password | |
| Ceph | http://manager.systems.in-a-box.cloud:7000 | admin | password | |
| Configuration | https://cgit.services.in-a-box.cloud | - | - | |
| Flower | https://flower.services.in-a-box.cloud | - | - | |
| Grafana | https://api.in-a-box.cloud:3000 | admin | password | |
| HAProxy | http://manager.systems.in-a-box.cloud:1984 | openstack | password | |
| Homer | https://homer.services.in-a-box.cloud | - | - | |
| Horizon | https://api.in-a-box.cloud | admin test | password test | domain: default, project: admin domain: test, project: test |
| Netbox | https://netbox.services.in-a-box.cloud | admin | password | |
| Netdata | http://manager.systems.in-a-box.cloud:19999 | - | - | |
| OpenSearch Dashboards | https://api.in-a-box.cloud:5601 | opensearch | password | |
| RabbitMQ | https://api.in-a-box.cloud:15672 | openstack | password | |
| Skyline | https://api.in-a-box.cloud:9999 | admin test | password test | domain: default, project: admin domain: test, project: test |
| phpMyAdmin | https://phpmyadmin.services.in-a-box.cloud | root_shard_0 | password |
Command-line interfaces
Login to Cloud in a Box as described in step 8 of the installation chapter.
- Select one of the preconfigured environments:
systemadmintest
- Set the environment by exporting the environment variable:
OS_CLOUD:export OS_CLOUD=admin - Use OpenStack CLI via the command
openstack.openstack availability zone list
openstack image list
openstack server list # After installation there are no servers
Log files
The logs that are logged on the console during the bootstrap and initial deployment
can be viewed in the file /var/log/install-cloud-in-a-box.log.
Import of additional images
The OpenStack Image Manager is used to manage images.
In the example, the Garden Linux image is imported.
osism manage images --cloud=admin --filter 'Garden Linux'
All available images can be found in the osism/openstack-image-manager repository.
Upgrade
It is best to execute the commands within a screen session, it takes some time. Please note that you cannot update the Ceph deployment at the moment. This will be enabled in the future.
osism apply configuration
/opt/configuration/upgrade.sh
docker system prune -a
Customisations
Use of 2nd NIC for external network
In the default configuration, the Cloud in a Box is built in such a way that an internal VLAN101 is used as an simulated external network and this is made usable via the 1st network interface using masquerading. This makes it possible for instances running on the Cloud in a Box to reach the internet. The disadvantage of this is that the instances themselves can only be reached via floating IP addresses from the Cloud in a Box system itself or via the Wireguard tunnel. Especially in edge environments, however, one would usually like to have this differently and the instances should be directly accessible via the local network.
To make this work, first identify the name of a 2nd network card to be used.
dragon@manager:~$ sudo lshw -class network -short
H/W path          Device          Class          Description
============================================================
/0/100/2.2/0      eno7            network        Ethernet Connection X552 10 GbE SFP+
/0/100/2.2/0.1    eno8            network        Ethernet Connection X552 10 GbE SFP+
/0/100/1c/0       eno1            network        I210 Gigabit Network Connection
/0/100/1c.1/0     eno2            network        I210 Gigabit Network Connection
/0/100/1c.4/0     eno3            network        I350 Gigabit Network Connection
/0/100/1c.4/0.1   eno4            network        I350 Gigabit Network Connection
/0/100/1c.4/0.2   eno5            network        I350 Gigabit Network Connection
/0/100/1c.4/0.3   eno6            network        I350 Gigabit Network Connection
In the following we use eno7. Activate the device manually with sudo ip link set up dev eno7.
Then check that a link is actually present.
dragon@manager:~$ ethtool eno7
Settings for eno7:
	Supported ports: [ FIBRE ]
	Supported link modes:   10000baseT/Full
[...]
	Link detected: yes
Now this device is made permanently known in the network configuration. Select the MTU
accordingly. For 1 GBit rather 1500 than 9100. The 2nd network interface should be
configured without IP configuration (neither static nor DHCP).
/opt/configuration/inventory/group_vars/generic/network.yml/opt/configuration/environments/manager/group_vars/manager.yml
network_ethernets:
  eno1:
    dhcp4: true
  eno7:
    mtu: 9100
Then, this change is deployed and applied.
osism apply network
sudo netplan apply
Now the configuration for Neutron and OVN is prepared. network_workload_interface
is expanded by the 2nd network interface. The order is not random, first vlan101
then eno7. neutron_bridge_name is added.
/opt/configuration/inventory/group_vars/generic/network.yml/opt/configuration/environments/manager/group_vars/manager.yml
network_workload_interface: "vlan101,eno7"
neutron_bridge_name: "br-ex,br-add"
Then, this change is deployed.
osism reconciler sync
osism apply openvswitch
osism apply ovn
osism apply neutron
Now segments and/or subnets can be configured. In this case, eno7 is configured as an
untagged port on the remote side.
/opt/configuration/environments/openstack/playbook-additional-public-network.yml
- name: Create additional public network
  hosts: localhost
  connection: local

  tasks:
    - name: Create additional public network
      openstack.cloud.network:
        cloud: admin
        state: present
        name: public-add
        external: true
        provider_network_type: flat
        provider_physical_network: physnet2

    - name: Create additional public subnet
      openstack.cloud.subnet:
        cloud: admin
        state: present
        name: subnet-public-add
        network_name: public-add
        cidr: 192.168.23.0/24
        enable_dhcp: false
        allocation_pool_start: 192.168.23.100
        allocation_pool_end: 192.168.23.200
        gateway_ip: 192.168.23.1
        dns_nameservers:
          - 8.8.8.8
          - 9.9.9.9
The additional public network can now be made known with
osism apply -e openstack additional-public-network.
There is now a 2nd floating IP address pool with the name public-add
available for use. If instances are to be started directly in this network,
enable_dhcp: true must be set. In this case, it should be clarified in
advance with the provider of the external network whether the use of DHCP
is permitted there.
Troubleshooting
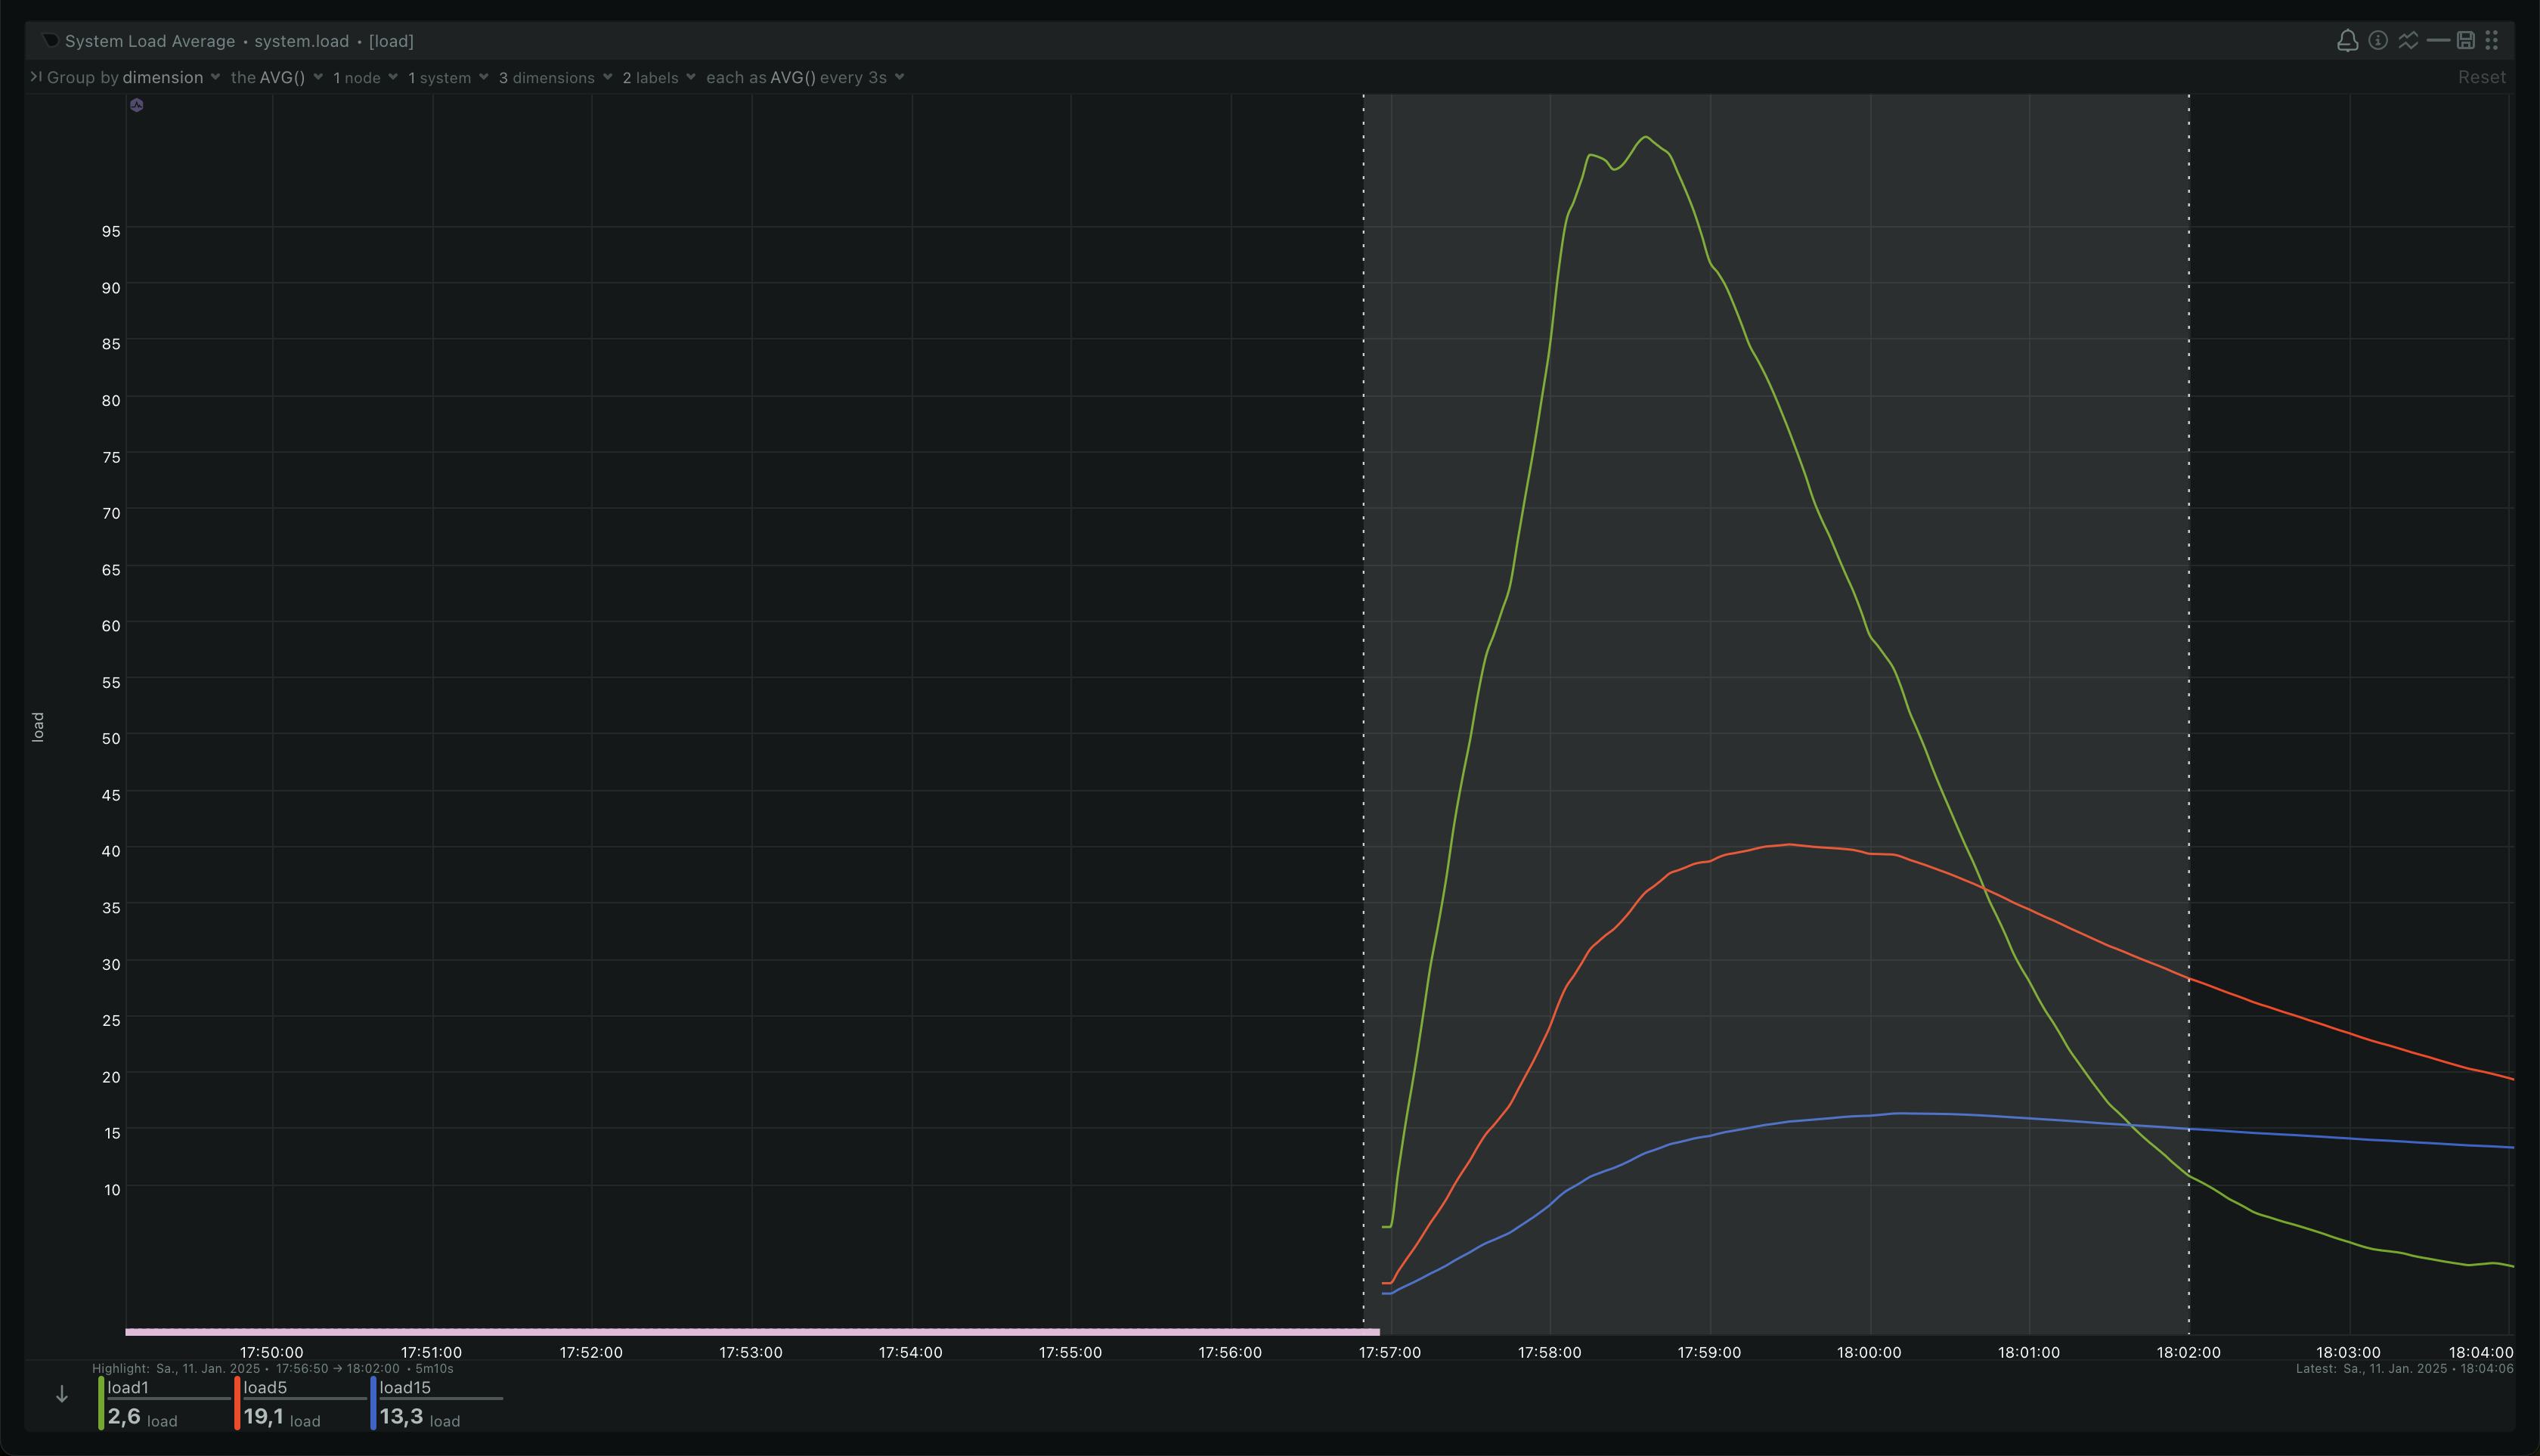
High load after reboot
After a reboot, there is a very high load for the first few minutes. Depending on which CPU is used, this can be over 100.
dragon@cumulus:~$ uptime
 16:58:12 up 1 min,  1 user,  load average: 101.44, 30.94, 10.78
After about 5 minutes, when all services have been started, this normalises again and the load drops well below 10.
Broken disk setup
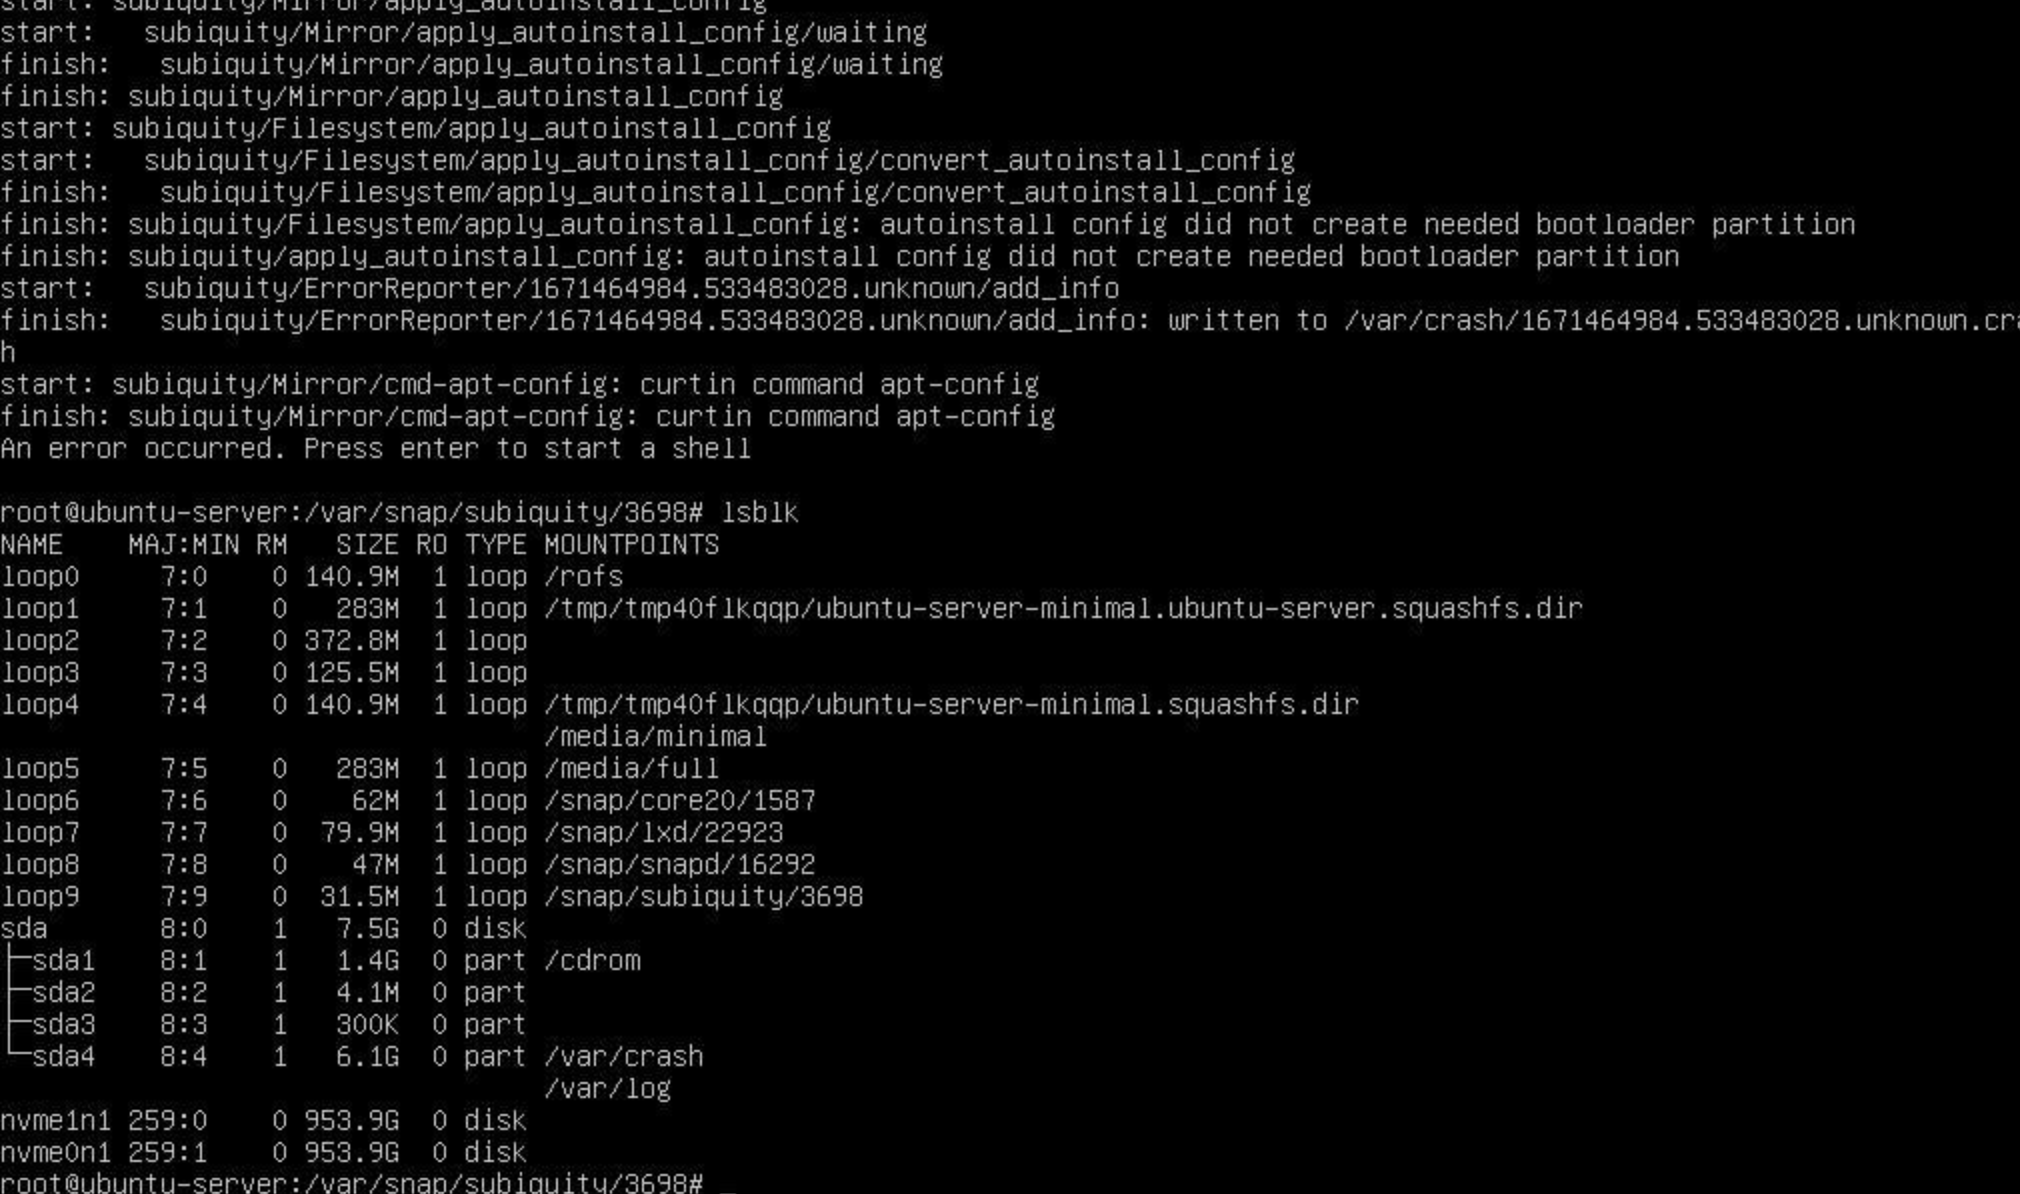
This error means that your disk setup is broken. Use cfdisk and delete all partitions on
the system on which you want to install the Cloud in a Box image.
With lsblk you can verify if the partitions are empty.
Development
For the further development of the scripts and the mechanisms of the Cloud in a Box, you need to know the following.
- The operating system is brought onto the node via an automatic Ubuntu installation that uses cloud-init
- The installation starts the script init.sh which performs
an initial clone of the osism/cloud-in-a-box repository and a checkout of
the
mainbranch. It also executes the deploy.sh and bootstrap.sh scripts. - The installation persists the kernel parameters of the initial boot to the file
/etc/.initial-kernel-commandline - The status and activities of the deployment are logged in
/var/log/install-cloud-in-a-box.log. For proper colors useless -r. Search forOVERALL STATUSto find the result of the specific installation steps. - Branch and location of the osism/cloud-in-a-box repository can be overriden
by setting the kernel parameters
ciab_repo_url(a public repository address without authentication) andciab_branch(a name of a branch, use only ASCII chars,-, and_).